- 인터페이스를 사용하여 개체, 이름 지정, 개체 형식의 매개 변수화를 설명하고 명명된 기존 개체 형식을 새 개체 형식으로 구성
- 인터페이스는 내부에 선언된 속성을 초기화하거나 구현하지 않습니다. 인터페이스의 유일한 작업은 형식을 설명하는 것이기 때문입니다. 인터페이스는 코드 계약에 필요한 항목을 정의하는 반면, 인터페이스를 구현하는 변수나 함수 또는 클래스는 필요한 구현 세부 정보를 제공하여 계약을 충족합니다.
interface Employee {
    firstName: string;
    lastName: string;
    fullName(): string;
}
let employee: Employee = {
firstName : "Emil",
lastName: "Andersson",
fullName(): string {
return this.firstName + " " + this.lastName;
}
}
employee.firstName = 10; //* Error - Type 'number' is not assignable to type 'string'
(참고) 인터페이스와 클래스
- TypeScript에는 구조 형식 시스템이 있기 때문에 특정 멤버 세트를 가진 인터페이스 형식은 같은 멤버 세트를 가진 또 다른 인터페이스 형식 또는 개체 형식 리터럴과 동일한 것으로 간주되며 해당 리터럴로 대체될 수 있습니다. 인터페이스와 클래스가 동일한 구조를 구현하는 경우 서로 바꿔 사용할 수 있습니다.
- https://www.typescriptlang.org/play#example/structural-typing
인터페이스를 사용하는 이유
- 일반적으로 사용되는 형식의 약식 이름을 만듭니다. 이전 예제에서 선언된 것과 같은 간단한 인터페이스의 경우에도 Intellisense 및 형식 검사의 이점을 얻을 수 있습니다.
- 인터페이스를 구현하는 모든 개체가 동일한 형식 정의에서 작동하기 때문에 일련의 개체에서 일관성을 유지합니다. 이는 개발자 팀과 함께 작업 중이고 속성, 생성자 또는 함수에 적절한 값이 전달되도록 하려는 경우에 유용할 수 있습니다. 예를 들어 인터페이스를 구현하는 개체는 인터페이스의 모든 필수 멤버를 구현해야 합니다. 따라서 올바른 형식의 필수 매개 변수를 모두 전달하지 않는 경우 TypeScript 컴파일러에서 오류가 발생합니다.
- 기존 JavaScript API를 설명하고 함수 매개 변수 및 반환 형식을 명확하게 지정합니다. 이는 jQuery와 같은 JavaScript 라이브러리로 작업할 때 특히 유용합니다. 인터페이스를 사용하면 함수에 필요한 항목, 함수가 반환하는 항목 등을 설명서를 반복적으로 찾아보지 않고도 명확하게 이해할 수 있습니다.
인터페이스와 형식 별칭(type alias)의 차이
- Employee 인터페이스를 type을 사용해 정의할 수도 있다
- 인터페이스
- 형식 별칭
- 인터페이스 : object 같은 데이터 셰이프를 설명하는 방법 형식 별칭 : 데이터 형식 정의. 공용 구조체나 튜플을 설명할 수 있다.
- 형식 별칭은 새 속성을 추가하기 위해 다시 열 수 없지만 인터페이스는 항상 확장 가능하다.
인터페이스 선언 및 인스턴스화
인터페이스 선언
- 인터페이스를 시작하려면 interface 키워드 뒤에 인터페이스 이름을 사용해서 시작한다.
- 인터페이스는 I(대문자 i)로 시작하지 않는다.
- 인터페이스 이름을 파스칼 표기법으로 대소문자 구별함.
파스칼 표기법(PascalCase)은 프로그래밍에서 변수, 함수, 클래스 이름 등을 지을 때 사용하는 네이밍 컨벤션 중 하나입니다. 파스칼 표기법은 각 단어의 첫 글자를 대문자로 시작하며, 단어와 단어 사이에는 공백이나 언더스코어(_) 없이 연결하여 사용합니다.
예시: FirstName, CalculateTotalAmount, UserInformation
- 인터페이스의 속성(멤버)은 필수, 옵션, 읽기 전용 등으로 지정할 수 있다.
멤버를 사용해 인터페이스 선언하기
(플레이그라운드에서) https://www.typescriptlang.org/play
인터페이스 선언
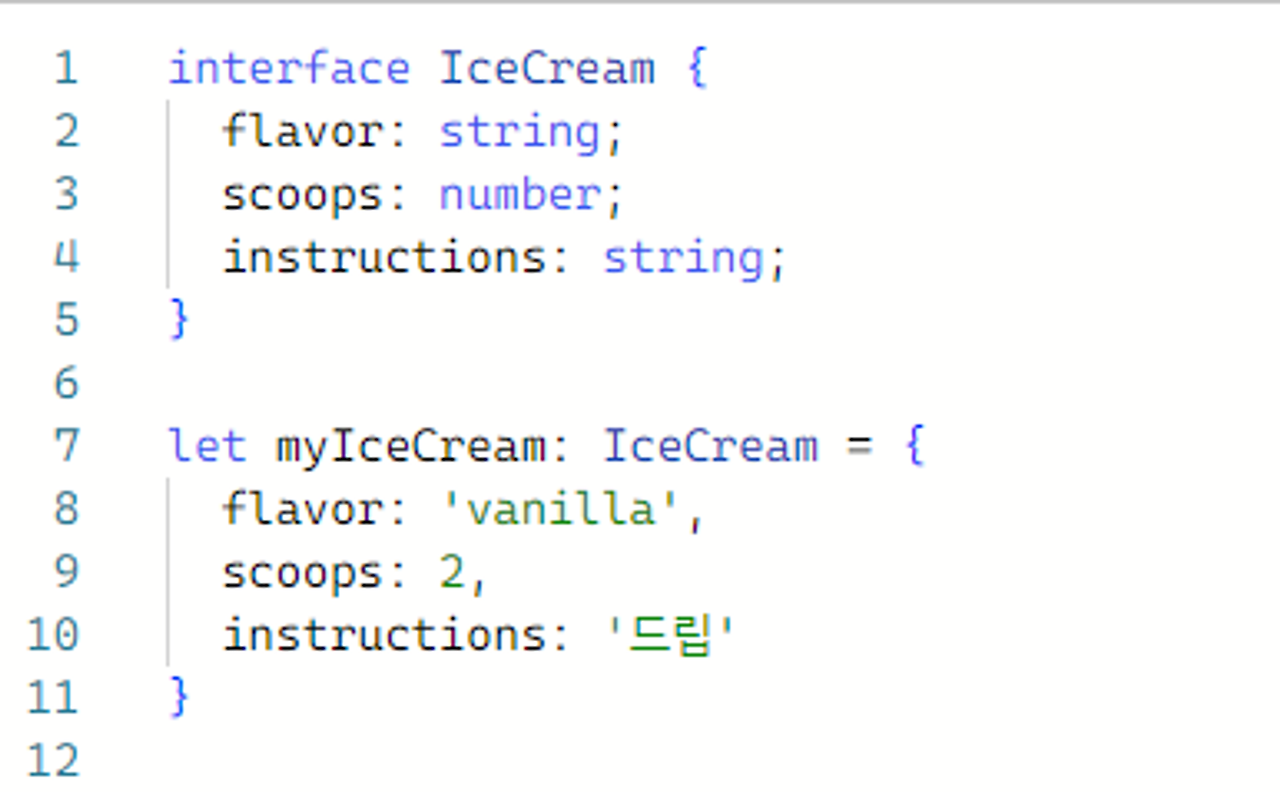
1. flavor와 scoops가 포함된 IceCream 인터페이스 선언
interface IceCream {
  flavor: string;
  scoops: number;
}
인터페이스 구현
2. myIceCream 이라는 변수를 IceCream 형식으로 정의한 후 필수 속성에 값 할당
속성 이름을 입력하기 시작하면 인텔리센스에서 제안해 줌
interface IceCream {
flavor: string;
scoops: number;
}
let myIceCream: IceCream = {
flavor: 'vanilla',
scoops: 2
}
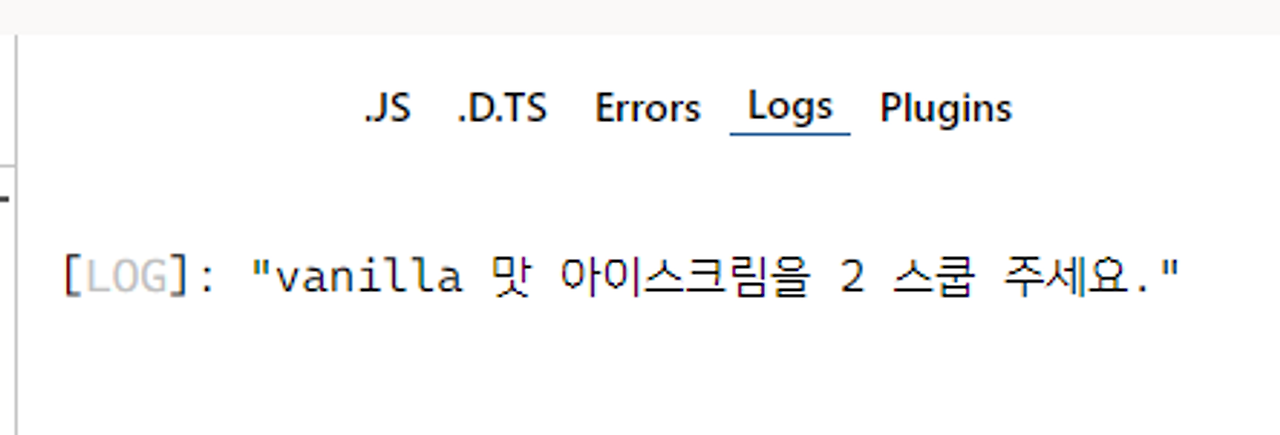
console.log(`${myIceCream.flavor} 맛 아이스크림을 ${myIceCream.scoops} 스쿱 주세요.`)
3. ‘실행’ 눌러서 콘솔 창 확인
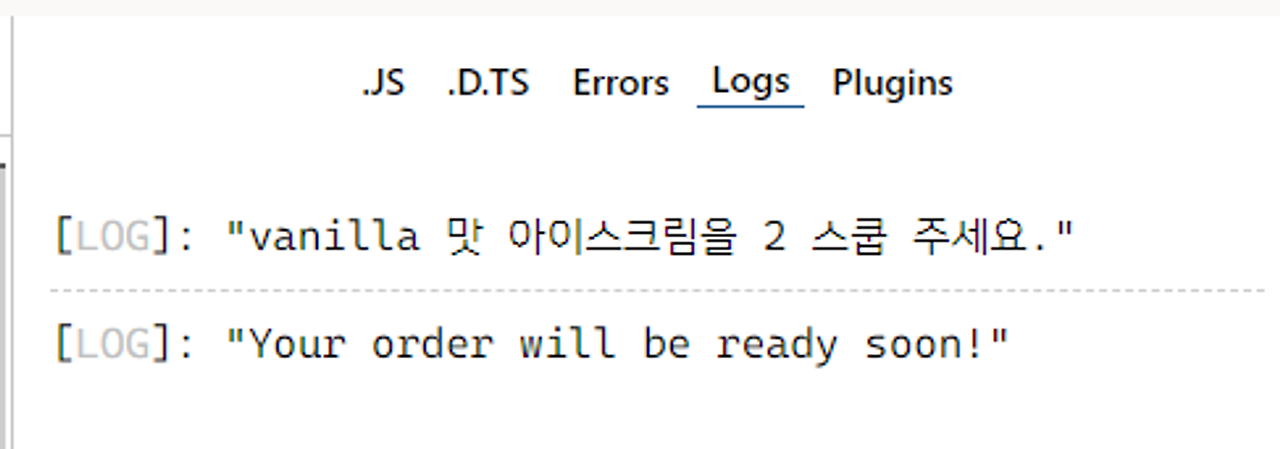
IceCream 인터페이스를 매개변수로 사용하는 함수 만들기
- IceCream 객체의 스쿱 수를 확인하고 결과에 따라 메시지 반환.
interface IceCream {
  flavor: string;
  scoops: number;
}

let myIceCream: IceCream = {
  flavor: 'vanilla',
  scoops: 2
}


function tooManyScoops(dessert: IceCream) {
  if (dessert.scoops >= 4) {
    return dessert.scoops + ' is too many scoops.';
  } else {
    return 'Your order will be ready soon!';
  }
}

console.log(`${myIceCream.flavor} 맛 아이스크림을 ${myIceCream.scoops} 스쿱 주세요.`)

console.log(tooManyScoops({
  flavor: '초코',
  scoops: 3
}))
자바스크립트와 타입스크립트 코드 비교
5. 자바스크립트에는 타입스크립의 인터페이스에 해당하는 것이 없다
"use strict";
let myIceCream = {
    flavor: 'vanilla',
    scoops: 2
};
function tooManyScoops(dessert) {
    if (dessert.scoops >= 4) {
        return dessert.scoops + ' is too many scoops.';
    }
    else {
        return 'Your order will be ready soon!';
    }
}
console.log(`${myIceCream.flavor} 맛 아이스크림을 ${myIceCream.scoops} 스쿱 주세요.`);
console.log(tooManyScoops({
  flavor: '초코',
  scoops: 3
}))
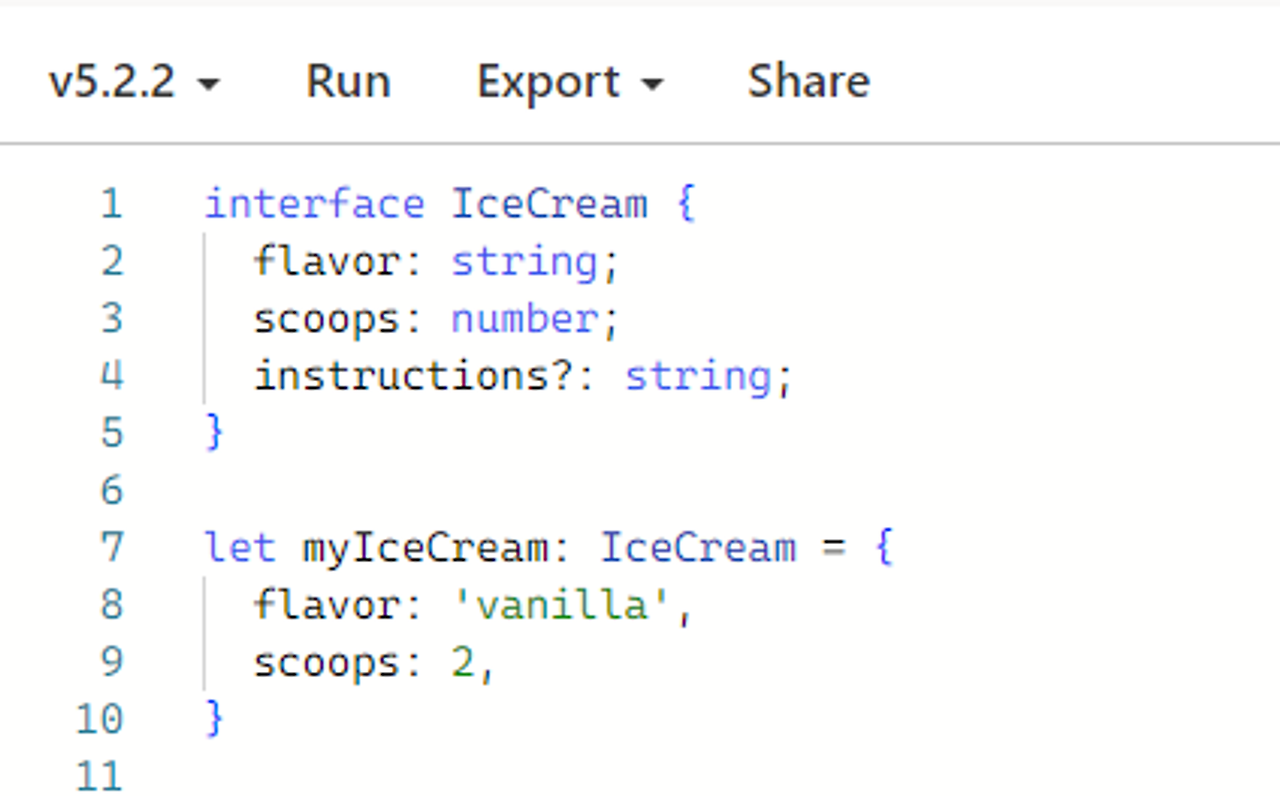
6. IceCream 인터페이스에 새로운 속성을 추가하면 어떻게 될까? instructions 속성을 추가해 보자.
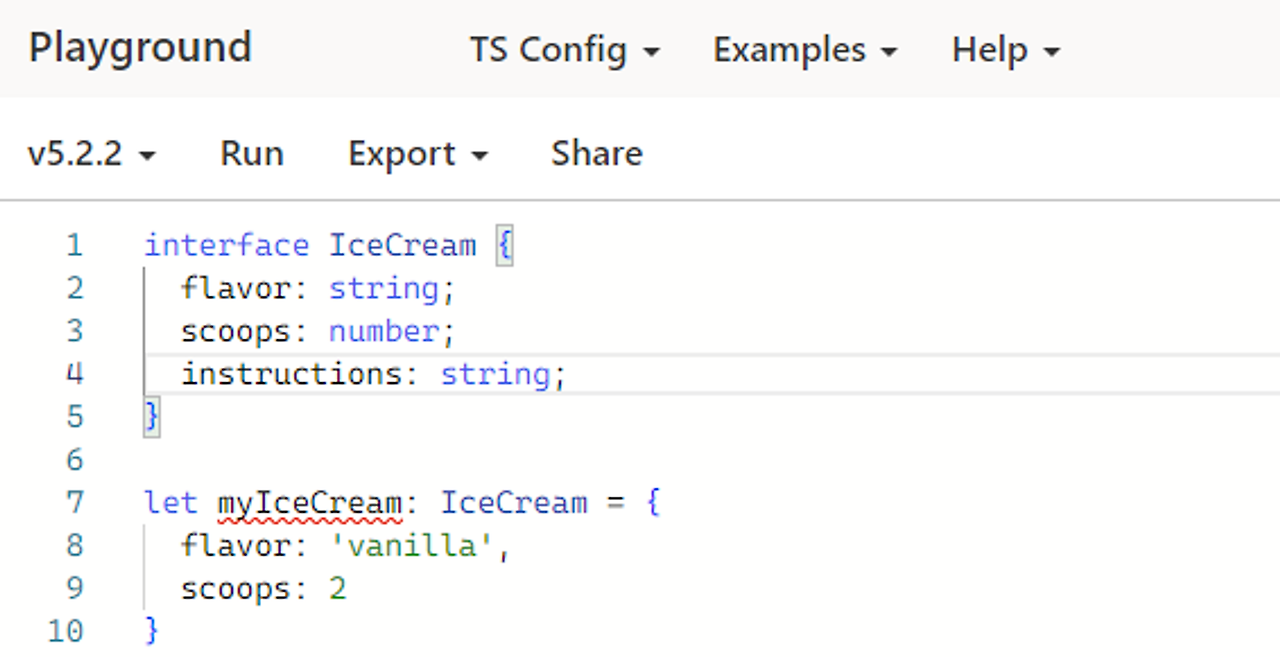
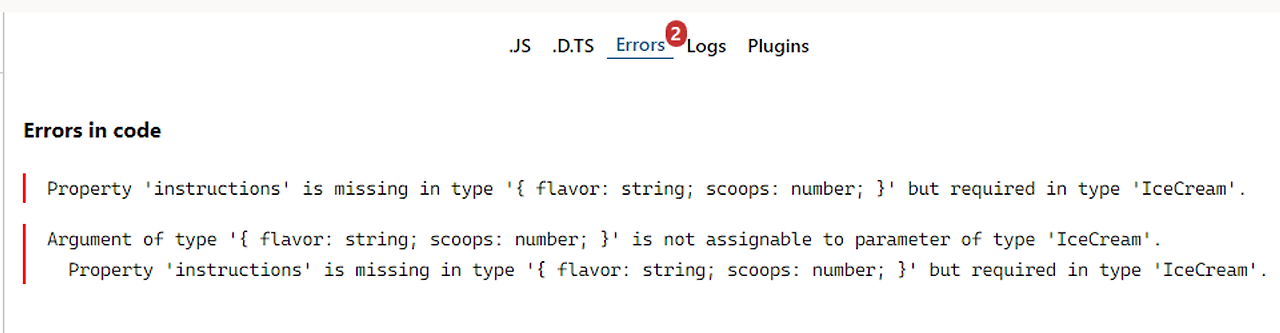
⇒ 해결하려면?
- 방법1) myIceCream 변수에서 instructions 속성을 정의해 주거나
- 방법2) instructions 속성을 옵션으로 처리하거나
인터페이스 확장
인터페이스를 왜 확장?
- 인터페이스는 서로를 확장할 수 있다.
→ 인터페이스의 멤버를 다른 인터페이스에 복사할 수 있어 더 유연한 방법으로 인터페이스를 재사용 가능한 구성 요소로 분리할 수 있다.
- 인터페이스를 확장하는 경우 규칙
IceCream 인터페이스 확장해서 토핑 올리기
1. 새로운 인터페이스 Sundae 만들기
Sundae 인터페이스: IceCream 인터페이스의 속성을 가지면서 다른 속성도 가지고 있다.
- 리터럴 형식 'chocolate' | 'caramel' | 'strawberry'의 sauce
- boolean 형식의 nuts(선택 사항)
- boolean 형식의 whippedCream(선택 사항)
- boolean 형식의 instructions(선택 사항)
interface IceCream {
  flavor: string;
  scoops: number;
  instructions?: string;
}


interface Sundae extends IceCream {
  sauce : 'chocolate' | 'caramel' | 'strawberry';
  nuts?: boolean;
  whippedCream?: boolean;
  instructions?: boolean;
}
2. 오류가 표시됨.
IceCream에 있는 instructions과 Sundae에 있는 instructions의 데이터 유형이 다르기 때문
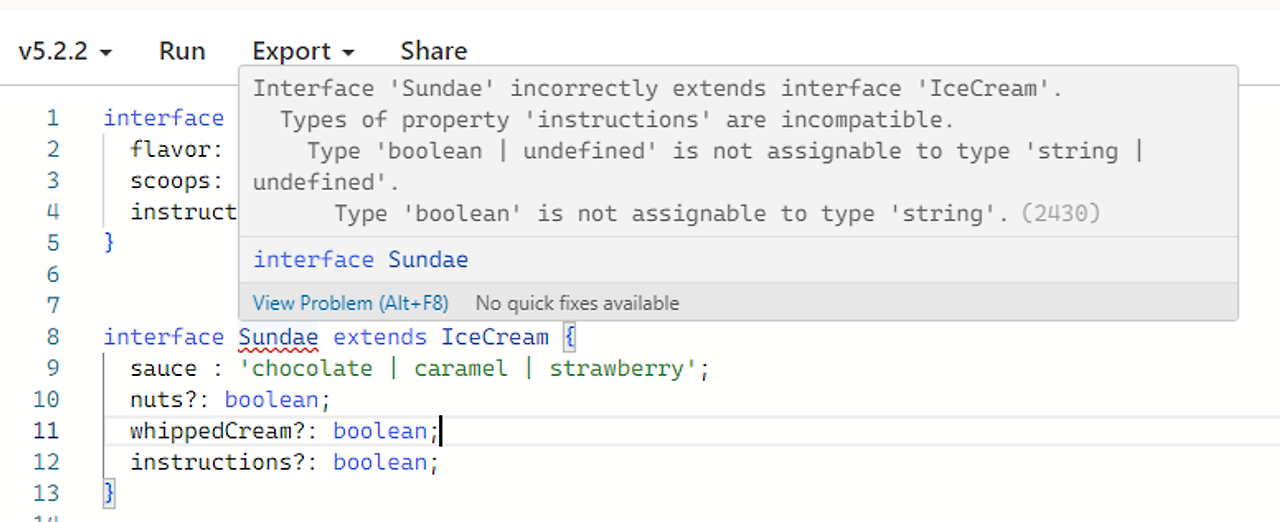
⇒ 여기에서는 string으로 통일하자!!
interface IceCream {
  flavor: string;
  scoops: number;
  instructions?: string;
}


interface Sundae extends IceCream {
  sauce : 'chocolate' | 'caramel' | 'strawberry';
  nuts?: boolean;
  whippedCream?: boolean;
  instructions?: string;
}
3. myIceCream 변수를 Sundae 인터페이스로 바꾸자.
sauce 속성은 필수이므로 myIceCream에 추가해야 한다!! 나머지 속성은 옵션.
interface IceCream {
  flavor: string;
  scoops: number;
  instructions?: string;
}


interface Sundae extends IceCream {
  sauce : 'chocolate' | 'caramel' | 'strawberry';
  nuts?: boolean;
  whippedCream?: boolean;
  instructions?: string;
}

let myIceCream: Sundae = {
  flavor: 'vanilla',
  scoops: 2,
  sauce: 'caramel',
  nuts: true,
}
4. tooManyScoops 함수에서도 Sundae 인터페이스 구현하자
수 매개변수에서 Sundae 인터페이스를 사용하겠다고 하면 오류 발생 → Sundae 인터페이스는 필수 매개변수가 3개라고!!
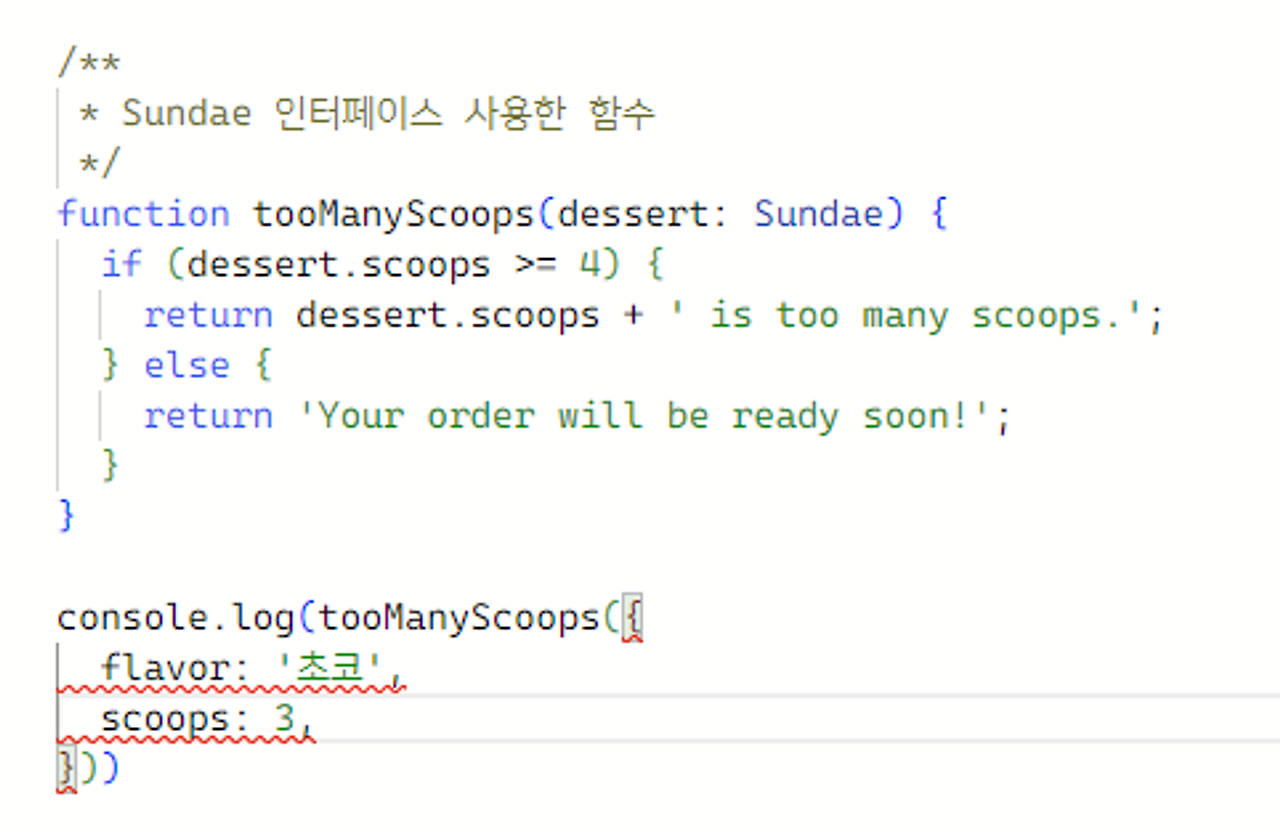
5. tooManyScoops 실행 코드에서 매개변수를 제대로 지정해 보자
/**
 * Sundae 인터페이스 사용한 함수
 */
function tooManyScoops(dessert: Sundae) {
  if (dessert.scoops >= 4) {
    return dessert.scoops + ' is too many scoops.';
  } else {
    return 'Your order will be ready soon!';
  }
}

console.log(tooManyScoops({
  flavor: '초코',
  scoops: 3,
  sauce: 'caramel'
})
인터페이스를 사용하는 다른 방법
인덱싱 가능한 형식 만들기
- 인덱싱할 수 있는 배열 형식을 설명하는 인터페이스 사용 가능
- 인덱스 시그니처 (인덱싱할 때 사용하는 형식)와 인덱싱할 때 반환 형식이 필요
- 인터페이스를 사용하면 해당 인터페이스를 사용하려는 모든 사용자가 일관되게 적용할 수 있도록 고유한 배열 형식을 정의할 수 있다.
- IceCreamArray 인터페이스 - 인덱스 시그니처를 number로 선언 - 반환 형식 string
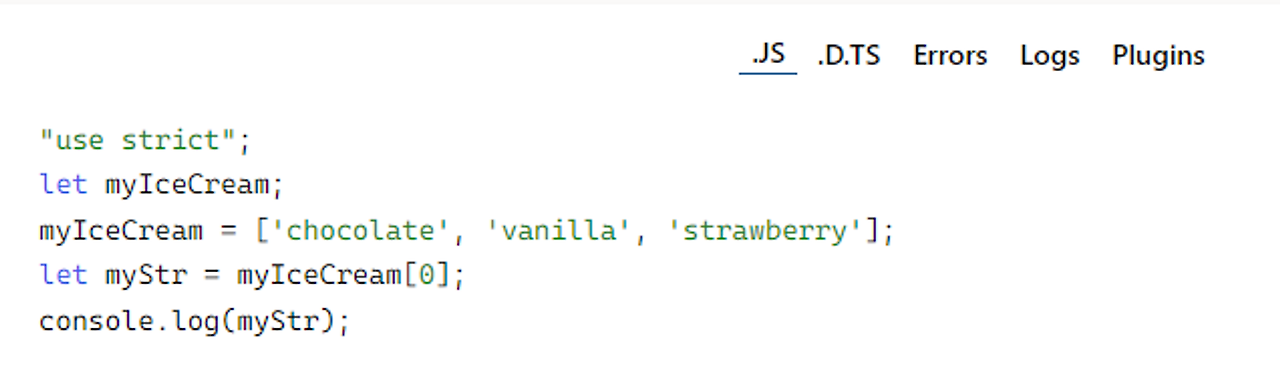
interface IceCreamArray {
[index: number]: string;
}
let myIceCream: IceCreamArray;
myIceCream = ['chocolate', 'vanilla', 'strawberry'];
let myStr: string = myIceCream[0];
console.log(myStr);
자바스크립트 API 설명
- 인터페이스를 사용하여 기존 JavaScript API를 설명하고 함수 매개 변수 및 반환 형식을 명확하게 지정할 수 있다.
- 인터페이스를 사용하면 API에 필요한 항목, API에서 반환되는 항목 등을 명확히 이해할 수 있다.
(예) fetch API - 네이티브 자바스크립트 API
- fetch URL: https://jsonplaceholder.typicode.com/posts
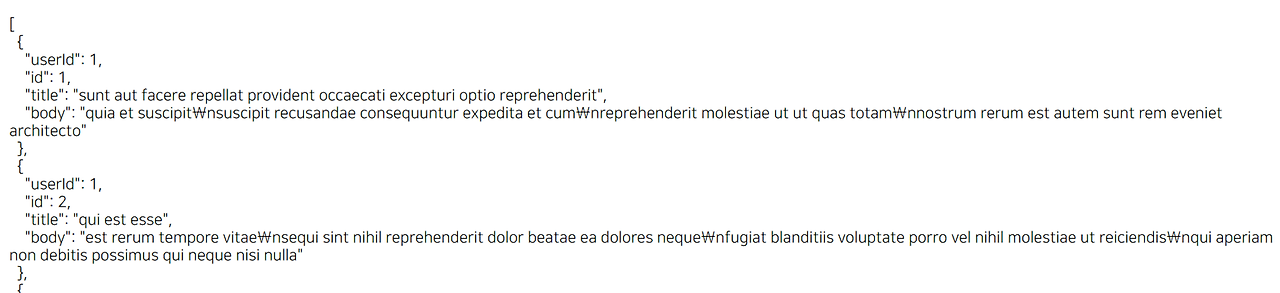
- json 데이터의 형태를 설명하는 인터페이스
const fetchURL = `https://jsonplaceholder.typicode.com/posts`;

// json 데이터의 형태를 설명하는 인터페이스
interface Post {
  userId: number;
  id: number;
  title: string;
  body: string;
}
- fetch와 async, await 사용해서 응답 만들기
const fetchURL = `https://jsonplaceholder.typicode.com/posts`;

// json 데이터의 형태를 설명하는 인터페이스
interface Post {
  userId: number;
  id: number;
  title: string;
  body: string;
}

async function fetchPosts(url: string) {
  let response = await fetch(url);
  let body = await response.json();
  return body as Post[];
}

async function showPost() {
  let posts = await fetchPosts(fetchURL);
  // 응답에 있는 첫번째 콘텐츠 디스플레이
  let post = posts[0];
  console.log(`Post #${post.id}`);
  // console.log('Author: ' + (post.userId === 1 ? "Administrator" : post.userId.toString()));
  console.log(`Author: ${post.userId === 1 ? "Administrator" : post.userId.toString()} `);
  console.log(`Body: ${post.body}`);
}

showPost();
결과 자바스크립트
"use strict";
const fetchURL = `https://jsonplaceholder.typicode.com/posts`;
async function fetchPosts(url) {
    let response = await fetch(url);
    let body = await response.json();
    return body;
}
async function showPost() {
    let posts = await fetchPosts(fetchURL);
    // 응답에 있는 첫번째 콘텐츠 디스플레이
    let post = posts[0];
    console.log(`Post #${post.id}`);
    // console.log('Author: ' + (post.userId === 1 ? "Administrator" : post.userId.toString()));
    console.log(`Author: ${post.userId === 1 ? "Administrator" : post.userId.toString()} `);
    console.log(`Body: ${post.body}`);
}
showPost();
인터페이스에 대한 더 많은 정보가 필요하다면
(이 글의 원문 : Implement interfaces in Typescript)
Implement interfaces in TypeScript - Training
Learn how to use interfaces to define object types.
learn.microsoft.com
'javascript' 카테고리의 다른 글
| [Typescript] 클래스 선언 및 인스턴스화 (2) | 2024.02.07 |
|---|---|
| [Typescript] 형식화된 함수 개발 (0) | 2024.02.07 |
| 캔버스 기본 도형 그리기 - 사각형 외 (0) | 2023.02.15 |
| [캔버스] 기본 도형 그리기 (0) | 2023.02.15 |
| 2023년부터는 나이가 줄어든다? - 만 나이 계산하기 (0) | 2023.02.09 |


